


When you’re craving classic, thin, tender crepes this is the crepe batter to make. There are a few techniques to know and a world of toppings to consider. Beyond that, all it takes is a bit of practice with a good pan, and you’ll be cranking out crepes, reliably, in no time.

Key Ingredients in Basic Crepes
You likely have many or all of the ingredients needed to make crepes! If you mix up some batter now, you can make crepes for your next meal.
- Milk: You can use full-fat or low-fat milk. Milk substitutes like oat milk or almond milk can also deliver good results.
- Flour: Unbleached all-purpose flour is the go-to for basic, classic crepes like these. That said, experimenting with other flours can result in wonderful crepes. I make these rye crepes regularly, and included a really great recipe in SNC where the crepes were made with a blend of corn flour and quinoa flour. So, once you get the basic technique for making crepes down, have fun branching out on the flour front.
- Eggs: You’ll see different ratios of eggs across crepe recipes. Eggs provide structure, but when you have too many eggs in relation to the flour, you end up closer to the omelette side of the spectrum. That’s not the texture I’m after. In this recipe you have 2 1/2 cups of flour and 4 eggs, and you end up with a crepe batter that is easy to work with.
How To Make Crepes
People seem to think making crepes is tricky. The one variable you need to get right is the pan. I recently tried to make crepes using our well-seasoned carbon steel skillet on induction and it was a no-go. Such a mess. If you have a pan that is crepe friendly, ideally ceramic or non-stick, you’ll be fine. I’ve been using the one pictured above lately (a SENSARTE White Ceramic Non-stick 12-inch Crepe Pan), and love it. This one:
The steps to reliably good crepes are as follows:

- Make the batter: This takes less than five minutes. You mix all your ingredients, then go on with the rest of your day. Day dream about toppings.

- Let the batter rest: This is a key step in making crepes. The batter rests for an hour or so allowing the flour to hydrate, thicken, and develop some strength and tenderness.
- Prepare your toppings: You want to have any toppings ready to go when you start cooking the crepes. I like to create a crepe topping bar so people can easily personalize their crepes.
- Cook the crepes: The fun part! Cook crepes one at a time and serve.
What To Serve with Crepes
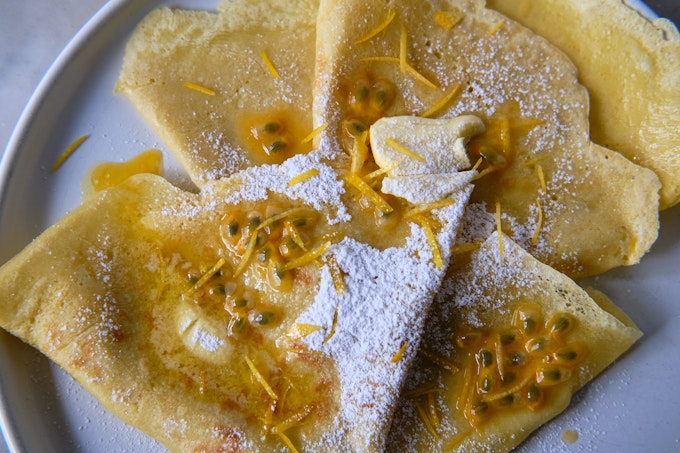
The thing to remember here is the crepes are the main event and simple accent toppings tend to work best. For example, if you’re making sweet crepes, a smear of good jam and a dusting of powdered sugar is all you need. Or, a bit of fresh passion fruit, salted butter, lemon zest, and a touch of sugar to finish (pictured here in lead photos). Resist the impulse to overload the crepe. Some other ideas on the sweet front:
- a finishing smear of compound butter – the saffron date butter is a favorite on the sweet front, and you can’t go wrong with scallion dill butter on a hot crepe.
- a crepe topped with a scoop of frozen yogurt or this honey ice cream.
- serve a sugar dusted crepe with a bit of this grapefruit curd spiked with ginger on the side.
And the savory front:
- roasted cherry tomatoes, goat cheese, torn fresh basil, and a drizzle of chile crisp is easy and always a hit.
- a simple crepe I made for lunch yesterday was sprinkled with a bit of gruyere, generously dusted with homemade onion powder, cooked extra golden, and then folded. I also love this version with za’atar in place of the onion powder. Soooo good!

- My favorite savory crepe topping is thinly sliced potatoes that have been cooked in a skillet. These potatoes with a few deeply caramelized onion, some crumbled goat cheese, and a good shake of this citrus furikake is chef’s kiss. If you have some of these baked mushrooms sliced thinly to toss in there, even better.
- Good pesto, sheep’s milk ricotta, and a dusting of Parmesan.
Crepe: Variations
Once you’re confident with this basic crepe technique, the ways to experiment are endless. Some ideas:
- Add herbs: As a last step, add a few tablespoons of finely chopped herbs to the batter – chives, dill, cilantro and basil are all favorites. I lean towards soft herbs here.
- Infused milk: Flavor the milk in the crepe batter with whatever you can dream of. Saffron is a beautiful favorite, and if you’re going the sweet route adding cinnamon to the batter is always fragrant and wonderful. Adding a spoonful of mustard to the batter brings something unexpected to the party, same goes for curry pastes, or even bouillon powder. Just avoid anything overly lumpy.
- Flours: As I mentioned up above, experimenting with the world of flour flavors in your crepe batter is rewarding. You can start but substituting 1/4 cup of an alternate flour and see how it goes. Make note and adjust the next time around.
Crepe Shapes
Crepes can take on a wide range of shapes. Have some fun with your folds and rolls! Each shape brings something different to the plate. The easiest shape is to simply fold a crepe in half before serving. Go a step further and fold the halved crepe into quarters for a wedge-shaped crepe. You can roll them. I often prefer a lazy roll, something not too tight, you can see an example in my hand here. 
You can also fold crepes into a packet shape by folding the rounded edges towards the center – this is a shape typical of Breton-style buckwheat crepes.
Crepe Making Tips & Tricks
- Transfer the batter: Take the time to transfer crepe batter to a pitcher for easy pouring and less mess. I like to fill a big measuring cup (the kind with the little easy-pour lip) full of the crepe batter. It makes pouring the batter into the pan tidy and easy.
- For easier clean up: Put a layer of parchment paper under your crepe-making zone for easy clean up. Crepe batter has a tendency to get everywhere.
- Make your crepes confidently. Use a light but determined touch if you are using the rake tool to spread batter across a flat crepe maker or pan. Or, a smooth swirl of the wrist to send batter evenly across a standard pan. Be quick and confident, and don’t be afraid to make a bit of a mess. See previous tip.
- Patching is fine! On occasion you’ll miss a spot when swirling or spreading your crepe batter. Quickly add a spoonful of batter to patch things up, not too much, and move on with your cooking.
- Making a filled crepe: Start with toppings at room-temperature. Slightly undercook the first side of the crepe, until it is just golden. Cook the second side for a flash, then flip back to the first side and fill. Finish cooking until crepe is done and toppings are hot and/or melted. Fold and eat. By undercooking the first side a bit you buy yourself some time later as you are waiting for your fillings to heat up a bit.

Make Ahead Crepes
You can pre-cook crepes ahead of time if you like. This is convenient if you’re preparing to feed a bunch of people at once. Stack cooked crepes between sheets of parchment paper, then reheat in a lightly buttered pan and fill with toppings when you’re ready to eat.
Advantages and disadvantages of using an electric crepe maker
For many years a 13-inch wide Tibos electric crepe maker was how we made crepes. It perches confidently on the counter, plugs into an electric outlet, and is a lot of fun! It came with a kit containing an assortment of tools that assist in the delicate and (sometimes) precarious art of crepe making along with a booklet of instructions. And for those of you who are adverse to single-use appliances, it can be used to make a lot beyond crepes; pancakes, buckwheat galettes, blinis, tortillas, crespelle, palatchinken, bricks, chapatis, beghrirs, spring roll skins, etc – all fair game.
The main downside to the stand-alone crepe maker is clean-up. It’s a heavier lift than wiping down a simple crepe pan. Inevitably crepe batter gets in the cracks and ledges and cord, so keep that in mind. This is the main reason I tend to reach for a pan versus the crepe machine more often than not. A crepe pan is also less expensive. So if you’re new to crepe making, start with a crepe and and if you want larger crepes or find yourself wanting to level up, then consider a dedicated electric crepe maker.
More Crepe Recipes
Pancake Recipes
More Breakfast Recipes
101 Cookbooks Membership


Premium Ad-Free membership includes:
-Ad-free content
-Print-friendly recipes
–Spice / Herb / Flower / Zest recipe collection PDF
–Weeknight Express recipe collection PDF
-Surprise bonuses throughout the year


")
