


")


If you want to build hamstrings that look strong and actually are strong, you don’t need fancy gym machines. You need one move — the Nordic curl.
This bodyweight beast has earned a reputation among athletes, lifters, and even physiotherapists for one reason: it works. And the best part? You can do Nordic curls at home — no leg curl machine required.
So grab a mat, a little creativity, and let’s build hamstrings that protect your knees, improve your deadlift, and turn heads.
What Are Nordic Curls?
Nordic curls (also called Nordic hamstring curls or sometimes Russian curls) are basically the ultimate bodyweight hamstring exercise. Picture this: you’re kneeling on your mat, someone or something is holding your ankles, and you slowly lower your entire body forward while keeping your knees planted. Your hamstrings are doing ALL the work to control the descent.


Sounds simple. WRONG! This exercise is brutally effective, and here’s why I’m completely obsessed with it:
The Nordic Curl Magic:
- Builds incredible eccentric hamstring strength (the lowering phase)
- Reduces hamstring injury risk by up to 51% (yes, that’s a real stat!)
- Requires ZERO equipment (well, besides something to anchor your feet)
- Works your hamstrings harder than most gym machines
- Improves athletic performance dramatically
- Can be done anywhere in your home
The best part? Nordic curls have been game-changers for professional athletes, and now we can do them right in our living rooms. How cool is that?
Nordic Curl Muscles Worked
Nordic curls light up the posterior chain — the muscles on the back of your body. Here’s what’s doing the work:


|
Muscle Group |
Role |
|
Hamstrings (Biceps Femoris, Semitendinosus, Semimembranosus) |
Primary movers – control the lowering phase |
|
Glutes |
Assist in stabilization |
|
Lower Back (Erector Spinae) |
Keeps your torso stable |
|
Calves |
Support during the descent |
These muscles work together to help you sprint faster, jump higher, and reduce the risk of hamstring tears — one of the most common sports injuries.
Setting Up Nordic Curls at Home: Creative Anchoring Solutions
Here’s where home fitness gets creative! In the gym, you’d use a fancy Nordic curl bench or GHD machine. But at home? We work with what we’ve got, and trust me, I’ve tried EVERY possible setup!
Option 1: The Couch Method (My Go-To!)
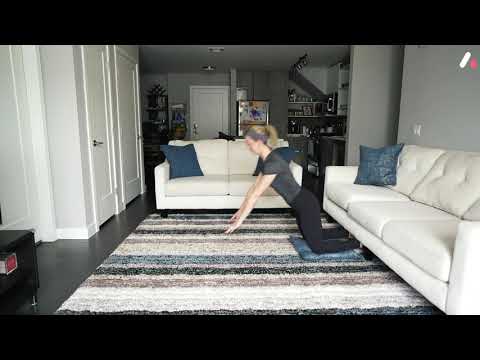
- Kneel facing away from your couch
- Slide your feet under the couch cushions as far as they’ll go
- Ensure the couch is sturdy enough not to tip (test this gently first).
- This is my favorite because the couch provides perfect resistance
Pro tip: Add weight to the couch cushions if needed
Option 2: The Workout Partner Method

- Have your partner, roommate, or family member hold your ankles
- They should apply firm, consistent pressure
- Make sure they’re prepared for how much force you’ll generate
- This is actually how I learned – my husband held my ankles!
Bonus: It’s a great bonding activity (and they’ll laugh when you struggle at first)
Option 3: The Heavy Furniture Method

- Use your bed frame, heavy dresser, or squat rack
- Hook your feet under the bottom edge
- Test stability before going full effort
Option 4: The Barbell/Weight Setup

- If you have a barbell, load it with plates
- Position it low and hook your feet underneath
- This gives you adjustable resistance by changing the weight
- Great for more advanced progressions
Option 5: The Resistance Band Hack

- Anchor a heavy resistance band to something stable
- Loop it around your chest/shoulders
- This assists as you lower
- Perfect for beginners who need help!
Safety Check Before You Start!
Listen, I’ve made mistakes, so you don’t have to. Before you attempt your first Nordic curl at home, do this safety check:
- Test your anchor point with gentle pressure first
- Make sure nothing will slide or tip
- Clear the space in front of you (trust me, you might face-plant)
- Have your hands ready to catch yourself
- Start on a thick yoga mat or padded surface for your knees
How to Do Nordic Curls at Home: Step-by-Step Guide
No gym? No problem. You can master Nordic curls right in your living room.
Step 1: Find an Anchor
You need something to lock your ankles in place — think:
- The edge of a couch
- A sturdy bed frame
- A partner holding your feet
Pro tip: Use a rolled towel or yoga mat under your ankles for comfort.
Step 2: Kneel Down
Kneel on a soft surface (yoga mat or carpet). Keep your knees hip-width apart and toes pointing down.
Step 3: Engage Core & Glutes
Tighten your abs and glutes to stabilize your spine. Don’t arch your lower back.
Step 4: Lower Slowly
Start lowering your body forward — as slowly as possible. Use your hamstrings to control the descent.
Once you can’t hold it anymore, catch yourself with your hands.
Step 5: Push Back Up
Use your hands to push yourself back to the starting position lightly.
Start with 3 sets of 4–6 reps, 2–3 times a week.
Nordic Curl vs. Leg Curl vs. RDL: Comparison Chart
| Feature | Nordic Curl | Leg Curl (Machine) | Romanian Deadlift (RDL) |
|---|---|---|---|
| Type of Exercise | Bodyweight (eccentric focus) | Isolation (machine-based) | Compound (free weight) |
| Main Muscles Worked | Hamstrings (eccentric), glutes | Hamstrings (concentric), calves | Hamstrings, glutes, lower back |
| Movement Type | Eccentric (lowering phase) | Concentric (curling phase) | Hip hinge (stretch-focused) |
| Equipment Needed | None or foot anchor | Leg curl machine | Barbell or dumbbells |
| Difficulty Level | 🔥 Advanced | 🟢 Beginner-friendly | ⚡ Intermediate |
| Muscle Growth (Hypertrophy) | ✅ High (eccentric tension) | ✅ Moderate | ✅✅ High (stretch under load) |
| Strength Development | ✅✅ Excellent | ✅ Moderate | ✅✅ Excellent |
| Injury Prevention | 🦵 Superior for hamstring strain prevention | 🟢 Helpful | 🦵 Good for posterior chain balance |
| Athletic Transfer | ⚡ Excellent (sprint & jump power) | ⚠️ Limited | ✅ Great for hip power & stability |
| Body Control & Core Use | ✅ High (full-body tension needed) | ⚠️ Low | ✅ Moderate (core stability) |
| Home-Friendly | 🏠 Yes | ❌ No | 🏠 Yes (with dumbbells/barbell) |
Common Nordic Curl Mistakes
Mistake #1: Breaking at the Hips
What it looks like:
- Your butt moves backward instead of your body staying straight
- You’re basically doing a weird good morning exercise
- Your hamstrings aren’t getting the full benefit
The fix:
- Think about pushing your hips forward throughout the movement
- Keep your body in one straight line from knees to head
- Squeeze your glutes HARD the entire time
- Film yourself from the side to check form
Mistake #2: Going Too Fast
The problem:
- You’re letting gravity do the work instead of your hamstrings
- This defeats the entire purpose of the eccentric emphasis
- You’re missing out on the injury-prevention benefits
The fix:
- Count slowly in your head (1-Mississippi, 2-Mississippi…)
- Aim for at least 3-5 seconds on the descent
- Think “controlled fall,” not “drop”
- Quality ALWAYS beats quantity here
Mistake #3: Progressing Too Quickly
What I see:
- People are trying full Nordic curls on day one
- Skipping the assistance phases
- Adding weight before mastering bodyweight
The fix:
- Follow my progression plan above
- Spend at least 2 weeks at each level
- Your hamstrings need time to adapt
- Patience = long-term success
Mistake #4: Neglecting the Negative
The problem:
- Only focusing on how far you can lower
- Ignoring the speed and control of the descent
- Missing the eccentric strength benefits
The fix:
- Make the lowering phase your main focus
- Aim for smooth, controlled movement
- Feel your hamstrings working the entire time
- Video yourself to check for consistent speed
Mistake #5: Poor Ankle Anchoring
What happens:
- Your feet slip out during the exercise
- You can’t generate proper tension
- Risk of falling or losing position
The fix:
- Test your anchor before each set
- Adjust your foot position as needed
- Don’t be afraid to try different setups
- Make sure your ankles are truly secure
FAQs
Why are Nordic curls so hard
They challenge your hamstrings in their lengthened position, where they’re weakest. This eccentric control builds massive strength but demands stability and body tension.
What are the benefits of doing Nordic curls?
-
Reduces hamstring strain risk
-
Builds strength for sprinting and jumping
-
Improves hamstring size and stability
-
Boosts athletic performance and acceleration power
What equipment do I need for Nordic curls?
Minimal!
You only need:
-
A partner, padded bar, or Nordic curl bench to anchor your feet
-
Optional: yoga mat, resistance bands, or stability ball for assistance
Why do my hamstrings cramp during Nordic curls?
Cramping usually means your hamstrings are weak or fatigued. Reduce the range of motion, rest properly, and stay hydrated. Strength will come with consistency.
Final Thoughts: Why Nordic Curls at Home Are Worth It
No gym? No problem.
Nordic curls at home are the ultimate low-cost, high-reward way to strengthen your hamstrings, prevent injuries, and boost athletic performance.
Yes — they’re hard. But that’s why they work. Each rep trains your body (and your mind) to stay strong through resistance.
Start small. Stay consistent.
Soon you’ll go from face-planting to owning those reps — and your hamstrings will never be the same again.


